Do you love kayaking and spending time in open waters? If you do, you probably need to learn how to mount a trolling motor to your kayak. It is a game-changer, and you do not need an expert to get it done.
A trolling motor propels a kayak faster than anyone can propel it for an extended period. With this accessory, you can save energy for more rewarding activities like fishing. Furthermore, you can spend more time on the water with a trolling motor.
As a result of all these advantages, more and more anglers are buying into the idea of installing trolling motors on their kayaks. If you want to install a trolling machine on a kayak, there are two positions you can use; the stern and the bow, and you can use a trolling motor bracket.
It would be best if you learned to do this by yourself so you can fish effectively and do more while on the water. In this article, we will walk you through the basics of trolling motor installation.
What You Need to Install a Trolling Motor on a Kayak
It does not matter where you want your trolling motor mounted; the installation process is straightforward and not complicated. So, if you can manage simple work tools, installing a trolling motor should be a walk in the park. Moreover, you will not require special tools; you should get the job done in an hour or less.
Note that the type of tools and gear you will need for installing a trolling motor on your kayak depends on your kayak. Also, the location on your kayak you want the trolling motor mounted is equally important.
So, to kick-start the installation process, you will need a trolling motor, a power battery, a drill, and a quick-release mounting bracket. Other secondary tools you may need include a screwdriver, waterproof silicone, battery box, and wiring kit.
Note that the trolling machine and the kayak brand may sometimes be different. Hence, to prevent technical difficulties, you should order the mounting bracket directly from its manufacturer. Using a bracket from the manufacturer guarantees that you will get a secure fit when you are done with the installation process.
- Trolling Motor: You must choose a suitable trolling motor for a seamless installation process. You will find that most brands have trolling machines designed for specific kayaks.
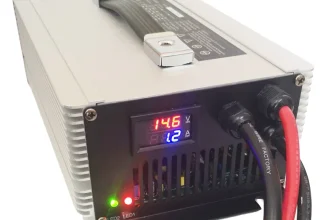
- Battery Box: You will need a battery box to store the battery in the kayak. You can fix and secure it to prevent it from getting tossed around in the kayak.
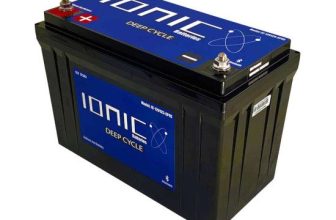
- Trolling Motor Battery: You will need a battery for your trolling motor. Ensure that the battery is lightweight, so you do not overload the kayak and make it unstable. You can consult the manufacturer for battery ideas if you do not know which type is best for your kayak.
- Drill: This is a useful tool because you will need to drill holes and install screws. You may not need a drill in every trolling motor installation process, but they are useful tools to have at hand.
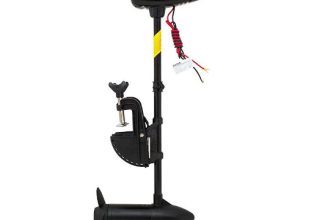
- Mounting Bracket (Quick Release): This type of mounting bracket is meant for bow-mount trolling motors. It allows you to detach the motor so you can move your kayak faster.
- Screwdriver: You might wonder why you need a screwdriver when you already have an impact/drill. Well, there are instances where you would need to use a manual screwdriver. For instance, the installation process requires that you work with a plastic material or fiberglass. Hence, it may not be wise to use a drill since it can cause unwanted damage. Using a manual screwdriver to drive screws into the fiberglass material makes more sense.
- Waterproof Silicone: You will need to put this sealant around the newly installed screws and holes in your kayak. This process helps to prevent water from getting into the kayak through the screw holes. However, you do not need a lot of sealants. A small tube of waterproof silicone will do just fine.
- Wiring Kit: If you want to make wiring your battery to the trolling motor easy, less time-consuming, and less messy, you will need a wiring kit. Some people may not recommend it, but it is an accessory that comes with its uses.
The installation process may not be difficult, but you will still need enough time to complete it. There’s no point starting a project and stopping when you are halfway done because you do not have enough time to spare. So, we recommend you spare at least one hour or two to complete the installation process.
Best Ways to Install a Trolling Motor: A Step-By-Step Guide
There are different trolling motors on the market, and they differ in terms of installation requirements and designs. Also, some trolling motors may come with all the hardware you need to install them with, while others do not.
If you buy a trolling motor that comes with all the necessary hardware, all you need to do is to follow the manufacturer’s installation guide to complete the mounting process. However, it is becoming increasingly hard to find ready-to-install trolling motors. Hence, there is a high chance that you may have to buy the battery, motor mount, and other hardware separately.
You can only begin the installation process when you find a suitable mounting area on your kayak. Nowadays, manufacturers of fishing kayaks make them versatile so they can meet the demands of their anglers. This is why installing a trolling motor is now possible and not overly complicated.
Before buying a trolling motor, ensure your kayak can handle its specifications. Working with the right trolling motor for your kayak makes the process simple and less time-consuming.
Let’s start with installing a trolling motor on a common mount position on a kayak.
How to Install a Trolling Motor on the Bow of a Kayak
This is perhaps the most common installation process. It depends on the trolling motor and the kayak you have at your disposal.
Step 1: Get the Right Motor and Batteries
The first step to successfully installing a trolling motor is buying a top-quality trolling motor and batteries. As we pointed out earlier, not all trolling motors and batteries will work for all kayaks and bows. Moreover, many manufacturers create motors and batteries that will only fit their brand. So, you have to ensure that you purchase the best trolling motor that fits your kayak.You must ensure all accompanying hardware is complete and nothing is left out.
Step 2: Sort It Out
Next, sort them in the order you need throughout the installation process. This will ensure you do not waste time searching for missing items in the thick of the installation process. Furthermore, some gears may come with extra screws, so do not be surprised if you find some extra screws after you have unpacked all the gears.
Step 3: Fix the Mounting Bracket on the Bow
You will need to fix the mounting bracket of your kayak’s bow. Most kayaks will have slightly different structures, so follow the bracket’s installation instructions religiously. Also, if the manufacturer doesn’t add a user manual to the gear, you should reach out to your local kayak store for assistance. The bracket will come with screws that you will use to fasten the bottom part of the bracket to the bow. For this process, you will need three to four screws. These screws should come with the hardware.
Step 4: Fix the Motor
Fix the bottom part of the quick-release on top of the bottom part of the motor bracket with the extra screw remaining in the box. Fix the top part of the quick-release bracket to the bottom of the top part of the trolling motor bracket. Before moving to the next step, you must ensure everything fits well.
Step 5: Wire the Motor
At this stage, you need to begin the wiring for your trolling motor. Wiring your trolling motor will be much simpler if you have a wiring box/kit. With the wiring box, you can connect the correct red wire to the plug to the available long red wire. If you do this right, you will also be able to do the same for the black wires.
If you do not like working with wires, you should have someone that can. Also, your drill/impact will come in handy at this stage because you may need to drill some holes to run wires through to fix important plugs. The process will be much easier if your kayak comes with removable plates.
Step 6: Plug It In
Next, if you run the wire from the battery to the trolling motor properly, you can proceed to plug it in and ensure that it works.
Step 7: Test It Out
Once you have completed the installation process, what’s left is for you to test it! Visit your favorite lake and test out your new creation. Have it in mind that you may need a moment to adjust to the new bow-mounted trolling motor. Take your time to learn how it works before launching out to catch fish.
So, what if your kayak does not have a place to mount a trolling motor at the bow? Do not worry. There are other spots you can use if the bow of your kayak isn’t mountable.
How to Install a Trolling Motor on Your Kayak’s Transom
While the bow mounting technique/option is fairly common, installing a trolling motor on the transom appears to be much simpler. The process is straightforward as long as you’ve got the right kayak and the correct mounting kit.
If you have an inflatable kayak, installing your trolling motor on the transom is your best bet. But this does not mean that only inflatable kayaks are suitable for mounting trolling motors on transoms.
To complete the installation process, you will have to follow the steps below:
Step 1: Place the Motor on the Transom
To begin, place the trolling motor’s bracket on the transom of your kayak. If you place this well, the trolling motor should automatically slide straight down your kayak’s rear part. As soon as you confirm it fits, it would be best to manually tighten the wing bolts using equal increments. Ensure you do not completely tighten one part before you move to the other part. If you do not do this, the trolling motor will sit awkwardly on one side of your kayak’s transom.
Step 2: Connect the Battery
At this stage, you will need to connect and activate the battery. If you choose to place the battery at the rear section of your kayak, you will not have to drill holes to make the necessary connections. However, If you dislike wires lying around in your kayak, you may want to drill holes and make the connections much neater.
Step 3: Set Up a Wiring Box
If you plan to have your trolling battery at the front part of the kayak, you will need a new wiring box. You have to drill holes and make allowances for the plugs. Once the wires are fixed and connected to the appropriate terminals, test the trolling motor to ensure that everything is running as it should.
Step 4: Go on a Test Drive
As with the bow-mounted trolling motor, you need to take the newly improved kayak for a ride on a lake. Do not expect the ride to be the same as before. You may find that you have different preferences to what was obtainable previously. You might want the motor lower or higher so you can adjust how you steer the trolling motor. Once you confirm that the installation is complete, you can begin customization processes matching your kayaking styles and fishing procedures.
A Few Points to Note When Mounting a Trolling Motor
Now that you know a thing or two about how to mount a trolling motor to a kayak, you need to know the expected specification for some of the hardware you will be buying.
Trolling Motor Size
You can’t just set out to buy a trolling motor for the sake of doing so. You must understand that a specification as simple as the size can greatly impact your kayaking experience. It can determine how much room you have in the kayak. The size of the battery can have a similar impact. In extreme cases, you can buy a trolling motor, and the battery may take up all the fishing space available in your kayak.
For example, if your desired trolling motor setup eats up space in the stern of your kayak, you may not have space left for a storage compartment that you can use for keeping your fishing equipment. Furthermore, the size of the motor’s shaft will impact its overall performance.
A longer shaft will perform better since it extends more into the water to cause more thrust. Unfortunately, with a longer shaft, you may be unable to fish in shallow waters.
Battery Capacity
On average, a trolling motor needs a 12-volt marine battery to function optimally. While it is rare to find motors that require a different battery specification, it is not impossible. There are motors on the market that will require a different battery specification. Apart from voltage, you can measure batteries by their power storage capacity. You will find this storage capacity measured in milliamp hours (mAh).
For instance, you could find a battery with a specification that contains a 250 mAh capacity. This only means that it will last for at least 125 hours if it consistently delivers a current of 2 milliamps during this period.
As a result, it is important to know the battery requirements for your trolling motor before you buy one. You should also know how much current your trolling motor requires when it is running at full speed. You can use this information to determine how long the battery will last when you are on the water.
Proper Power
Also, the above information may not seem like much, but you must know from the beginning that you will have to buy a battery that can supply your trolling motor with the appropriate power.
When making this choice, you need to create a balance between buying a battery with the capacity to power your trolling motor appropriately but is not too heavy to add extra weight to the overall weight of the kayak.
Conclusion
It does not matter which mounting style you choose. Installing a trolling motor will greatly improve your kayaking and fishing experience. An automated paddling system will reduce fatigue and increase how much time you can have on the water.
If you choose to buy a trolling motor by yourself, know that it is not enough to know how to mount a trolling motor to a kayak, you need to know the right kits to buy as well.